

Marketing
Guest Post: How to Create a Lead for Every ClickDimensions Posted Form
by ClickDimensions Marketing

Thank you to Megan Walker, Microsoft MVP, for this guest post!
I’ve loved ClickDimensions for a long time, at least 10 years. I’ve used it as a Marketing Manager and taken the exams to become ClickDimensions Certified. In short, I think it’s an awesome product, and one I recommend any organization review to see if it’s right for their business. That being said, although the solution might be right, the standard processes might not always fit each business model.
I recently encountered a situation with a client using ClickDimensions. When a form on their website is completed, the standard process checks to see if the email address submitted already exists on a lead or contact in the Dynamics 365 Customer Engagement (D365CE) environment. If it does, the posted form created will be linked to that record. If it doesn’t, a new record will be created; either a lead or a contact depending on the settings on the web form.
Add New Fields to the Posted Form
For each posted form, my client wanted to have a new lead created, every single time. Although I agree with the process ClickDimensions created, there are occasions when an organization would want to go a different route. Depending on the nature of their business, and what they consider a Lead to mean to them, each submission of a specific Web Form might indeed mean an individual Lead that needs to be managed and nurtured by a business development or sales team.
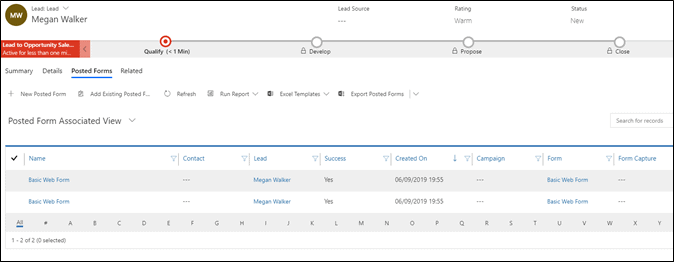
Here we see a lead with a number of posted forms, which is the typical standard process.
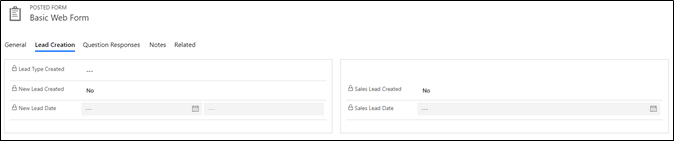
Before we look at how to achieve a new lead for each Posted Form, let’s look at a few new fields I’ve created on the posted form entity. First, we have Lead Type Created. This will either be a New Lead (meaning they were not currently in our system before this posted form was submitted) or a Sales Lead (meaning they were already in the system, but our process has created a new lead). We’ve then got a Two Option field for New Lead Created and the same for Sales Lead Created. These are displayed as checkboxes. Finally, a date field for each type of lead. We also have these on a new form rather than using the standard ClickDimensions form. We might want to refer back to that later on rather than modifying it.
Microsoft Flow Process
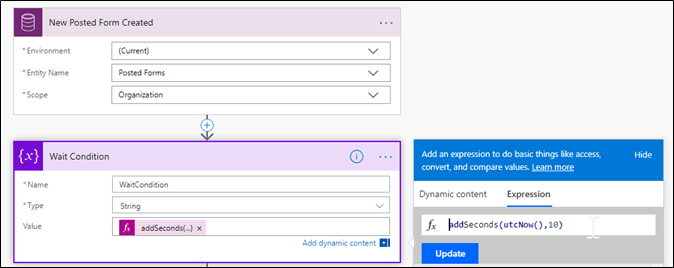
Now on to the process. Microsoft Flow is the tool of choice. If you haven’t used it yet, it’s pretty straightforward once you start, plus you can follow each step all the way through. Be sure to check the plan you have with your organization. We are going to use the CDS (Common Data Service) Connector which is Premium so you must have either Plan 1 or Plan 2. Our first step is the trigger. We need the trigger for when a new posted form is created. Select the current environment, find the posted forms entity, and select Organization as the Scope. Next, we add an Initialize Variable action. We can call it anything, but I have just called it WaitCondition. The type is String and the Value needed should be addSeconds(utcNow(),10).
Add this into the Expression field and click Update. The expression will take the current time and add 10 seconds to it.
Next, search for the Delay Until action. The reason for this step is due to how the ClickDimensions process runs when a form is submitted. The form comes in and the email is searched for. If it can’t find the email, the lead (or contact) record will be created. Then the posted form record is created and all the posted field records are created and linked to the posted form. This can take time, not long, but long enough that if we start on the next step in the Flow, we won’t have all the posted fields created just yet. Ten seconds seems to be plenty of time. So, in this step, we take the WaitCondition dynamic content and add it in as the timestamp. We are now waiting for 10 seconds before we move on.

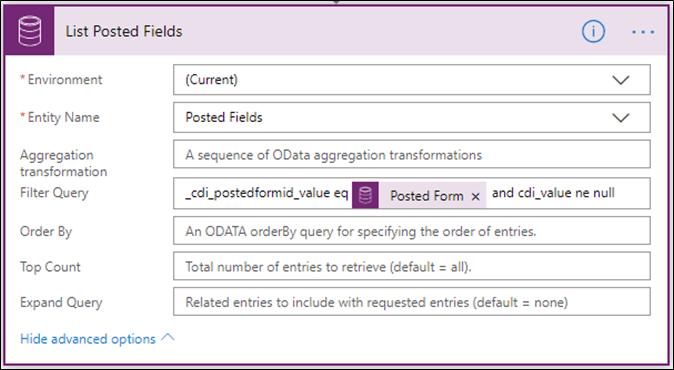
Now we are using the CDS connector again and picking the List Records step to list all the posted fields linked to the posted form in the initial trigger step. Show the advanced options and paste the following into the Filter Query. This will get all posted fields where the Posted Form ID is equal to the Posted Form ID from the trigger step. It will also get all posted fields where the value isn’t empty.
_cdi_postedformid_value eq @{triggerBody()?[‘cdi_postedformid’]} and cdi_value ne null
Map Your Web Form Fields
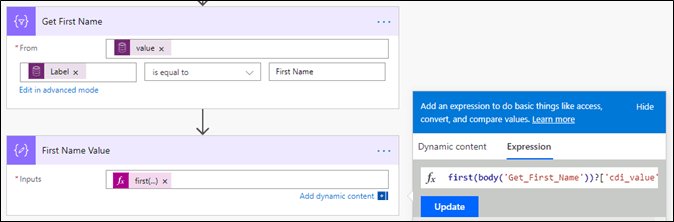
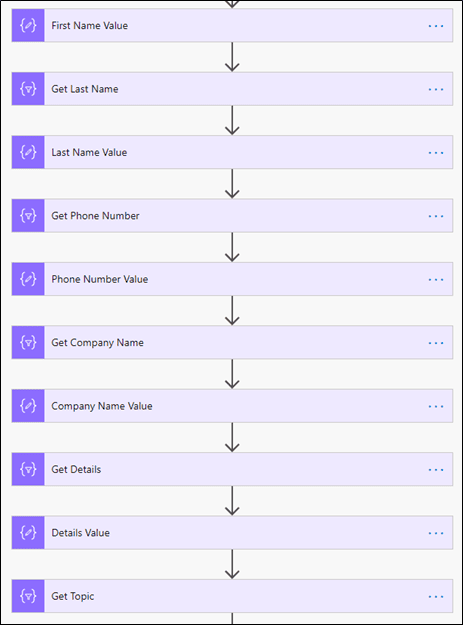
Each form field gets mapped to a specific field in Dynamics. When the lead is created for the first time, each field is used to populate values on that lead record. With this approach, our new lead that we are going to create isn’t going to get the same experience. So, we need to map the fields within the Flow. We need actions for each field. The first is called Initialize Variable. The second is called Compose. For the first, we will use the value from the List Posted Fields step. Our condition is then that the label of the posted field is equal to First Name, or whatever the label is that you used for your question. In the Compose step we then need an expression to get the value from the variable found in the previous Initialize variable step. Notice in the expression that it shows Get_First_Name. You will need to use whatever you have named the step above. So, make them logical and short! Use the underscore for any spaces you added to the name.
first(body(‘Get_First_Name’))?[‘cdi_value’]
Yes, you will need to do this for each question on your form. Remember, you are setting up the mapping all over again.
Do We Even Need a New Lead?
Now we need to figure out if the new lead is needed. Add a Condition step. Use the contact from the first trigger step on the posted form and set it to not equal to, then add null as an expression to the last box. We want to see if the Contact field on the posted form has been populated. If it has, we know right away that a new lead needs to be created. This was NOT a posted form created that is a first-time submitter.
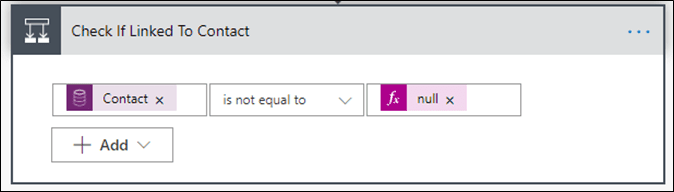
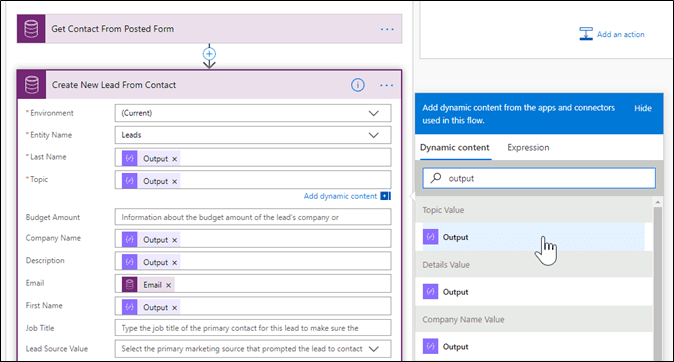
Is not equal to null means that there is something in that field, so the Yes column for the condition starts with a CDS Get Record action to get the contact record from the posted form. Just use the Contact ID in the item identifier for this step. Pretty simple.
The next step is a CDS Create Record action. We are going to create a lead. This is where we use all the outputs from our mapping steps and populate them in the right field. This is why naming your steps is important. I know exactly which output to put into which field. The email address can be populated directly from the Email field on the contact – no need to map that one.
The next step is a CDS Update Record step. We will update the posted form and link it to the new lead record we just created. The record identifier is the Posted Form ID from the initial trigger step. We now set the Lead field with the new lead record we just created. At the same time, we will set the Lead Type Created value to Sales Lead, set the Sales Lead Created field to Yes and populate the Sales Lead Date with utcNow() as the expression.
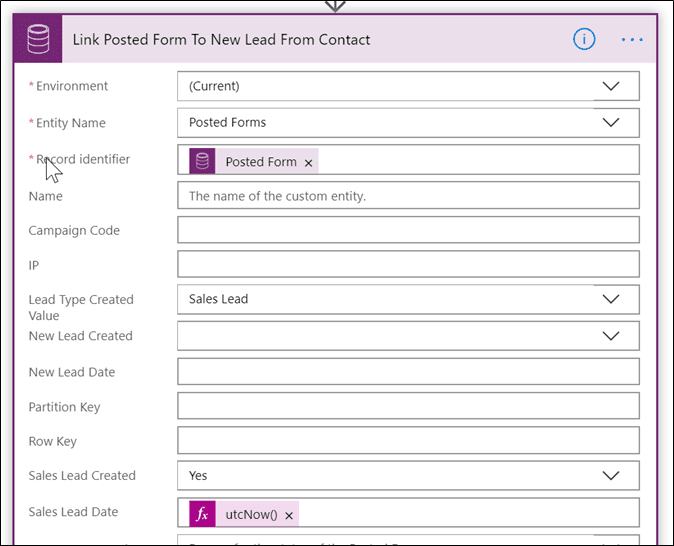
These fields will then be updated on the posted form record in Dynamics.

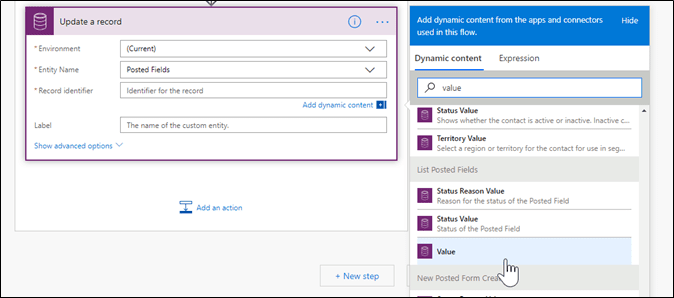
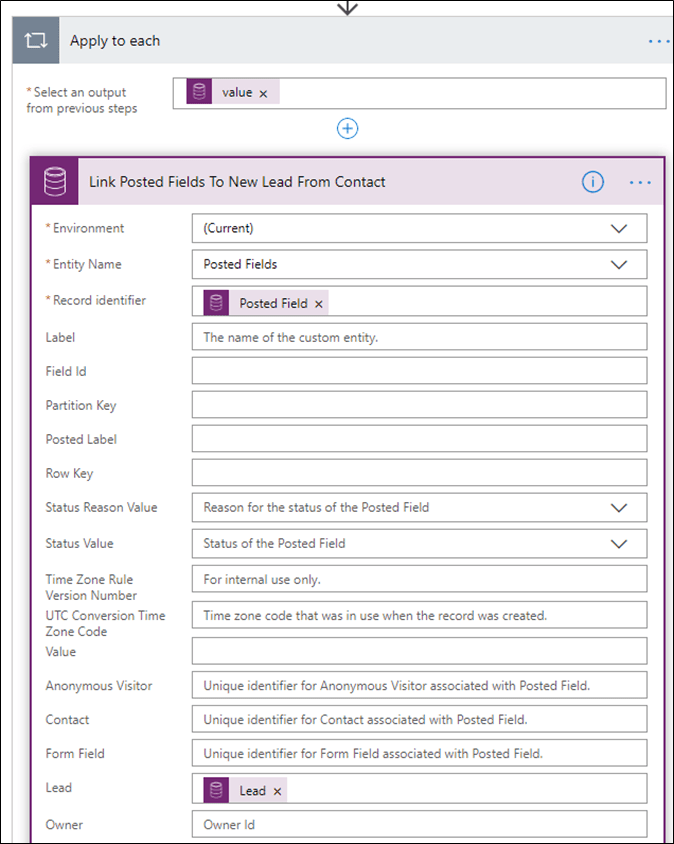
All the posted fields linked to the posted form also have a Lead field on them, so we need to update those with the new lead we just created. In our initial List Records step, we just got the posted fields that had a value, which is great for the mapping. Now we need another List Records step and this time we will get all the posted fields related to the initial posted form created. Then we add another CDS Update, a Record step and select the Posted Fields entity. The record identifier should be the value from the second List Posted Fields step.
What happens next can sometimes be a little confusing. An Apply To Each window appears and sets your update to a Record step inside it. This is just showing that the step will run on each posted field record that it finds. It could be one, could be 100. Now we need to add the Lead ID from the step above where we created the new lead.
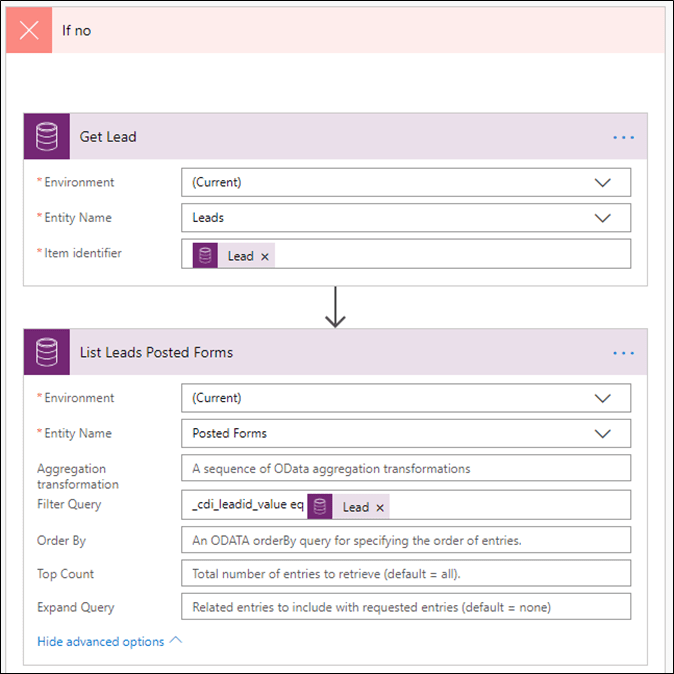
All of that was for if we had a contact already linked on the posted form. What if it’s a lead? Now we go down the No side of the condition. Our first step is to do a CDS Get Record step and use the Lead ID from the original trigger step at the beginning. Now we need to do some checking to figure out if this is a new lead or an existing one. If it’s brand new, we won’t create a new one. We are going to do a CDS List Records step and use the following Filter query.
_cdi_leadid_value eq @{body(‘Get_Lead’)?[‘leadid’]}
Check the Existing Lead Record
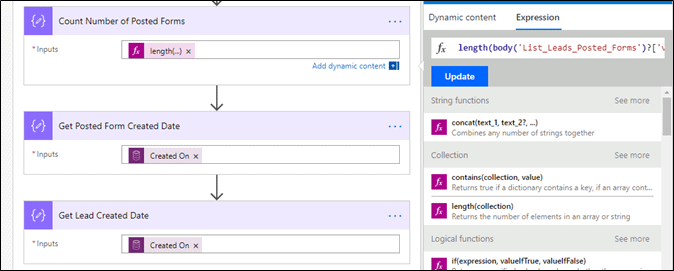
Then we will add in three Compose steps to get bits of information needed to do some checks. The first one will count the number of posted forms that came back in the previous action step. In the expression below, you can see I used List_Leads_Posted_Forms because that is what I called my List Records step. Make sure to rename that to match your own step.
length(body(‘List_Leads_Posted_Forms’)?[‘value’])
The next two steps are to get the Posted Form Created Date and the Lead Created Date.
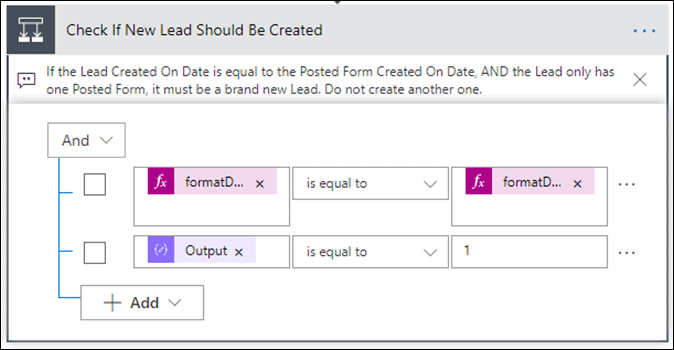
Next is another condition. We are checking to see if the Lead Created On Date is equal to the Posted Form Created On Date AND that the lead only has one posted form. If the condition is met, it must be a brand-new lead. The dates are stored with date and time, and the seconds are going to be different on the two dates, so we need to use expressions to convert them into year, month and day instead. To do this, use the following expressions. Instead of Get_Lead_Created_Date and Get_Posted_Form_Created_Date, use the names you gave those specific condition steps. The output is from your Count Number of Posted Forms step.
formatDateTime(outputs(‘Get_Lead_Created_Date’),’yyyy-MM-dd’) is equal to formatDateTime(outputs(‘Get_Posted_Form_Created_Date’),’yyyy-MM-dd’)
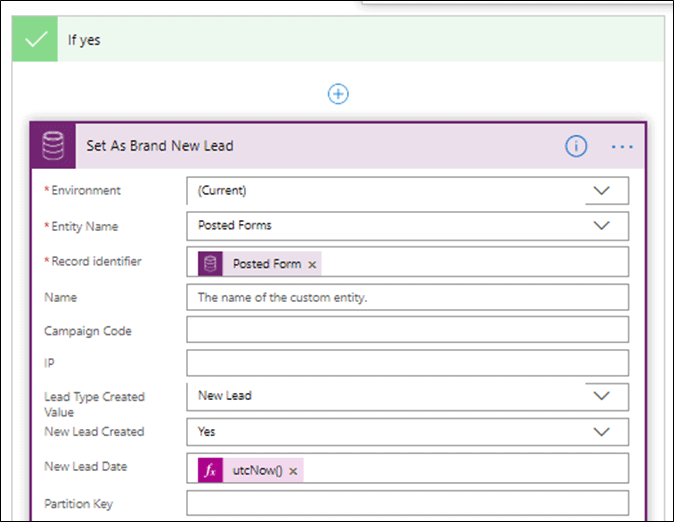
If our condition is met, even though we don’t want to create another lead, we do want to update the new fields created in Dynamics. So we add in a CDS Update Record step and set the Lead Type Created Value to New Lead, the New Lead Created to Yes and New Lead Date to utcNow().
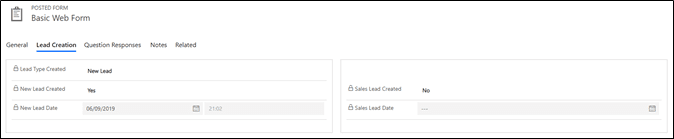
Now when your posted form comes through and it is a new lead, the record will be updated to reflect this.
For the No side of the condition, it is pretty much the same as the process used to create the new lead from a contact record. You will need the CDS Create Record step to create your new lead, using the outputs to map all the fields and the email address from the existing lead record. You will then link the posted form to the new lead you created using a CDS Update record and then do another CDS Update record to update the posted fields and link them to the new lead. In your step to link the posted form to the new lead, remember to set your Lead Type, Sales Lead Created and Sales Lead Date fields.
Once you have finished, test out your Flow by filling out a web form. Do it a few times to test all your scenarios. This new process gives you flexibility to do it for all your web forms or just one depending on your needs. Just modify the flow at the beginning to check the web form that’s been completed.

Related Resources

5 Easy Steps to Launch Your Employee Advocacy Program
The key to launching a successful employee advocacy program is planning ahead. This step-by-step guide is based on our experience helping hundreds of B2B marketing teams get social advocacy [...]

3 Internal Teams That Shape Social Media Marketing Success
Here’s a great business debate for you: which department within an organization should own social media? Marketing may immediately come to mind, but what about customer service or sales? [...]

5 Reasons You Should Survey Your Customers
Asking questions is an essential part of how we all learn and grow. This is as true for businesses as it is people. And it is the root of [...]

