

Marketing
How to Create a Lead Scoring Strategy
by clickdimensions

Lead scoring involves ranking leads on a scale based on how interested a prospect is in a company’s products or services, how likely they are to buy and how soon they will be ready to move from prospect to customer. Using a lead scoring model, prospects are assigned points based on the actions they take. So, a lead that downloads an eBook might earn 10 points, while one that visits your company’s pricing page earns 25 points.
Lead scoring may seem easy at first, but it can also be intricate and complex. And a lot of customers just don’t know where to begin. The good news for ClickDimensions customers is that our platform offers some default score settings, and there’s some logic behind our choices. Even better, though, is the fact that you can tailor these score settings to be specific to your business—your goals, your use cases and your strategy, whether your company is B2B or B2C. While there is no one perfect lead scoring strategy—it’s not one-size-fits-all—this post should be able to provide some guidance and empower you to make the most of the lead scoring functionality in ClickDimensions.
First, a note on vocabulary: the industry term is “lead scoring,” but that is a bit of a misnomer. ClickDimensions also scores contacts and anonymous visitors in addition to leads. Once those anonymous visitors are identified, their score will carry over to the contact or lead record.
Creating a comprehensive lead scoring strategy can benefit you in several ways. It can show you a list of warm leads, or individuals actively taking an interest in your business. You can then take action on those leads—and even automate that process via a CRM workflow or a campaign automation —or distribute a ClickDimensions quick send. You can also filter out uninterested or unqualified leads.
The default lead scoring settings give equal value to successful form submissions and the creation of opportunities. This is because form submissions, like opportunities, typically indicate conversions. If, on the other hand, you’re using forms to update contact information or as a subscription management method, you may want to lower the form submit success score accordingly. This may prompt you to give extra weight to opportunity records; feel free to leave that one as is or bump it up as appropriate for your business.
Additionally, every visit is scored five points and every page view gets three points by default. If you’re only tracking certain key pages, such as your product page, you may want to increase these scores and leverage the campaign tracking script to set up some advanced reporting in CRM. For more on how to customize the tracking script in these ways, please view this help article.
If you’re putting the tracking script in a global footer, this can lead to inflated lead scores. You may want to lower these scores or use the custom lead scoring script on specific pages. The most obvious example of this is your Careers page. If someone is bouncing around your site, they’re most likely going to be generating visits and page views that can rack up their score. However, if they land on your Careers page, that’s an indicator that they’re not a qualified lead but instead someone looking at your company from an employment perspective. In this case, we would recommend setting the Careers page with a negative value to filter out employment prospects from your qualified leads.
Your lead scoring strategy for email clicks is heavily dependent on your business goals. If you’re a high-volume sender, you may want to decrease your email click score to avoid inflation in lead scoring. On the other hand, if you’re a company that sends fewer, more targeted emails, you should consider increasing your email click score.
Lastly, as previously mentioned, you can use the Total Score field on a lead or contact record to do some incredible things inside of CRM. One recommendation would be to create a custom view to show your qualified leads—or create a couple of views to show your leads on a tiered basis (cold, warm, and hot, for example). You can tweak your levels as you get more comfortable with lead scoring, but putting some stakes in the ground based on your scores and customer volume is a good place to start. For example, maybe after looking at your scores, you feel like anyone who hits a threshold of 100 would be considered a warm lead, and anyone who hits a threshold of 500 would be a hot lead. These values are arbitrary, so it’s up to you to give them value.
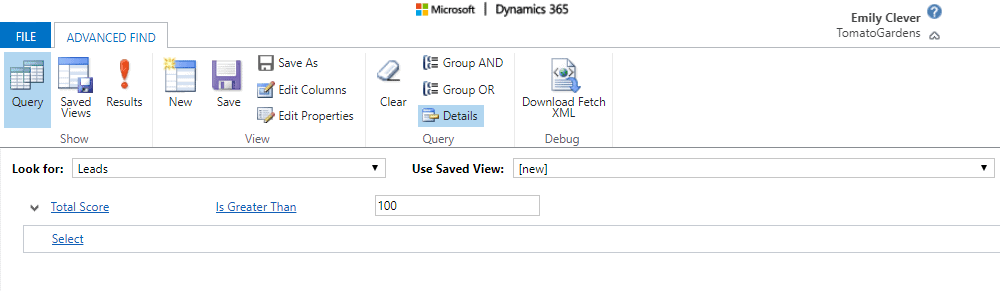
You can create a simple Advanced Find using the “Total Score” field and then save these as views for your environment.
You can then use this view to easily shoot off some quick send emails to your qualified leads.
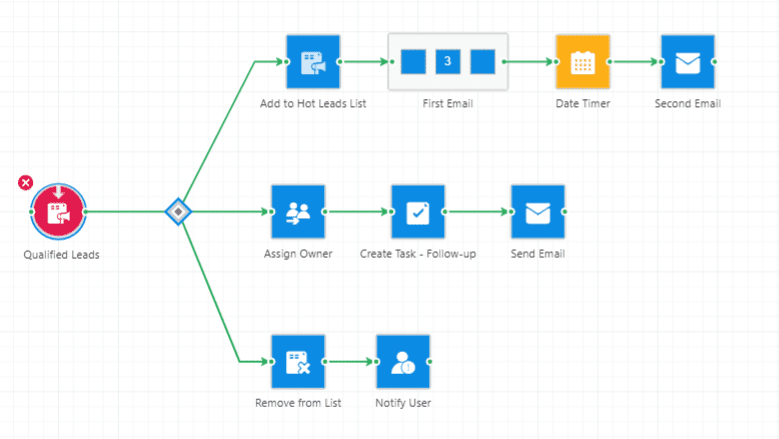
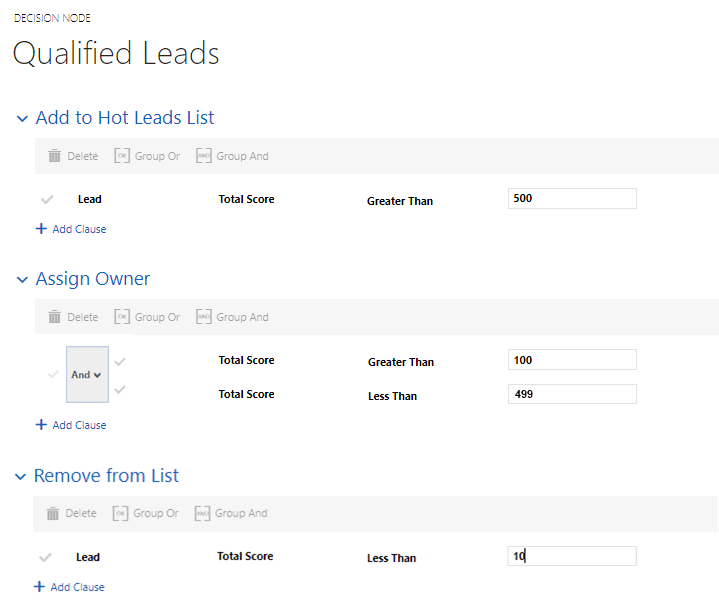
You can also use the Total Score field in a campaign automation Decision Node to segment out individuals in a nurture or drip flow. In the example below, everyone who gets added to my Qualified Leads marketing list is filtered into different paths based on the tiers we set up earlier. If their score is greater than 500, they’re going to go down my “hot leads” path, which includes adding them to a new marketing list, sending out a series of emails and a few other actions. If they’re on my “warm leads” path, I’m going to assign them to a particular user, create a task for that person so they can follow up and reach out via an email to start that first contact. And if their score is less than 10, I’m going to remove them from this marketing list and notify a particular user, who can investigate the situation in more detail.
Or, you can use our recommended workflow to create a notification for your team once an individual hits a particular target score.
Happy Marketing!
Related Resources

5 Easy Steps to Launch Your Employee Advocacy Program
The key to launching a successful employee advocacy program is planning ahead. This step-by-step guide is based on our experience helping hundreds of B2B marketing teams get social advocacy [...]

3 Internal Teams That Shape Social Media Marketing Success
Here’s a great business debate for you: which department within an organization should own social media? Marketing may immediately come to mind, but what about customer service or sales? [...]

5 Reasons You Should Survey Your Customers
Asking questions is an essential part of how we all learn and grow. This is as true for businesses as it is people. And it is the root of [...]

